The original Pilates exercises require a high level of strength and athletic ability. Because of this Pilates workouts often use modified versions of the original exercises. Although they may be similar in some ways to the original exercises, modern day Pilates workouts can end up being more like a mixture of posture correction and basic core stability. There’s nothing wrong with this, but it’s not exactly Pilates. Sometimes, rather than do a modified version, it’s better to break the exercise up into components and master them individually. The Pilates roll up exercise (sometimes called “Pilates sit up”) requires a combination of strength, flexibility and control. The steps shown here will help you to master these individually, in order to be able to do a perfect roll up exercise.
Benefits of the Pilates roll up exercise for abs and flexibility
- Trains the rectus abdominis (6-pack) muscles through a greater range than a crunch
- Ab muscles also have to work eccentrically (that is, as they lengthen) to control the curling back down
- The deep core muscle (transverse abdominis) has to work to stop the low back arching
- Improves spine and hamstring flexibility
- Improves coordination and movement control
Step by step Pilates roll up
Work through these 4 steps to achieve a perfect Pilates roll up and enjoy all the benefits above.
Workout level: this is a step by step guide, so is intended for beginners. However, you should allow enough time and practice for each step before moving on. It’s important to build the strength, flexibility and spine mobility to do the full roll up correctly. If you don’t, you won’t get the full benefits from the exercise and could end up with a back or hamstring injury.
You will need to do these exercises on a cushioned surface. Ideally, you should use an exercise mat. See an exercise mat buying guide here.
Before you start exercising, please read these guidelines.
STEP 1 | Weeks 1 & 2 – standard crunch and hamstring stretch
Standard crunch
The roll up requires strength in the “6-pack” muscles and the ability to curl through the spine one vertebra at a time, sometimes called “segmental control”. So we’re going to start by doing crunches, focusing on making it a curling movement.

- Lie with knees bent, feet flat on the floor about hip distance apart
- Put your hands behind your head. Keep your elbows out to the side.
- Engage your abdominal muscles and start to lift your head and shoulders off the floor. Peel your spine off the floor one segment at a time.
- When your shoulder blades have left the floor, start to reverse the movement. Ease your spine back down one vertebra at a time.
- Practice 3 times a week and aim to get up to 30 crunches
Hamstring stretch

The roll-up finishing position needs flexibility in the hamstrings, so we need to work on this.
Muscles should always be warm before stretching.. Do this stretch when you are warm from exercise or general activities like walking or household chores. Alternatively, see this post for some good warm up exercises.
- Lie on the floor with one leg bent, foot flat on the floor. Straighten the other leg and gently pull it towards you, holding onto it with both hands either on the calf or above the knee.
- Hold the position when you feel the stretch along the back of the leg.
- After holding for a count of 20, try to ease the leg in a bit further. Don’t force it, though.
- Hold for a further count of 20 and then release.
- Practice 3 times a week.
Step 2 | Weeks 3 & 4 – The shoulder bridge
Now we’re going to do some work on segmental control. This is an important part of the roll up exercise (and several other Pilates exercises). The shoulder bridge is often used in Pilates for beginners to learn segmental control, because it’s a comfortable, safe position for your back.

- Start by lying on your back, knees bent and feet about hip distance apart.
- Press your lower back into the floor, so that your tailbone lifts.
- Now follow this movement through so that your lower back starts to peel off the floor. You will probably find this difficult at first as parts of your spine will be less flexible.
- Continue with this movement until your weight is resting on your shoulders.
- Now reverse the movement, lowering the spine down one vertebra at a time.
- Repeat 5 times
- Practice 3 times a week, also keep working on crunches and hamstring stretch 3 times a week.
Step 3 | Weeks 5 & 6 – Roll down
By now, you should have done the groundwork and have some ab strength, hamstring flexibility and segmental control. To start working towards the roll up, we’re going to start in the sitting up position and roll down part of the way.

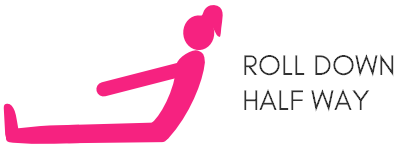
- Start by sitting with your legs together, stretched out in front. Your back should be straight. Take your arms to shoulder height, reaching forwards.
- Exhale as you engage your core muscles and start to lean backwards. Stop when you get to about halfway down, as shown in the picture above. Take a breath and exhale as you reverse the movement.
- Make sure your heels stay touching the floor
- Repeat 10 times
- Practice 3 times a week
Step 4 | weeks 7 & 8 – The full Pilates roll up
After 2 weeks of practising the roll down, you should be ready to try the full roll up. If you find that you’re not ready yet and it’s hard to control the movement all the way through, just go back and practice step 3 for a bit longer. Remember that correct technique is very important in Pilates for good results and safety.

- Lie flat on the floor with your legs together, arms stretched out above your head. Make sure your low back isn’t arching.
- Breathe in as you reach your arms up towards the ceiling.
- Breathe out as you start to roll up through the spine. Remember that you should be focusing on segmental control. It should be a smooth, curling movement.
- When the whole of your spine has left the floor, keep stretching forward over your straight legs, as shown.
- Stop when you have stretched as far as your hamstrings will allow.
- Breathe in and then breathe out as you roll back down to the starting position. Again, focus on segmental control – return one vertebra at a time onto the floor.
- Repeat 10 times.
Once you can do the roll up, keep practising regularly to keep your abs in shape.

